How to Build a Modular Display Wall That Grows With Your Collection

This post teaches you how to plan, build, and expand a modular wall-mounted display system for your minifigure collection. You'll learn which materials work best, how to arrange figures for visual impact, and how to design a setup that accommodates new acquisitions without starting from scratch.
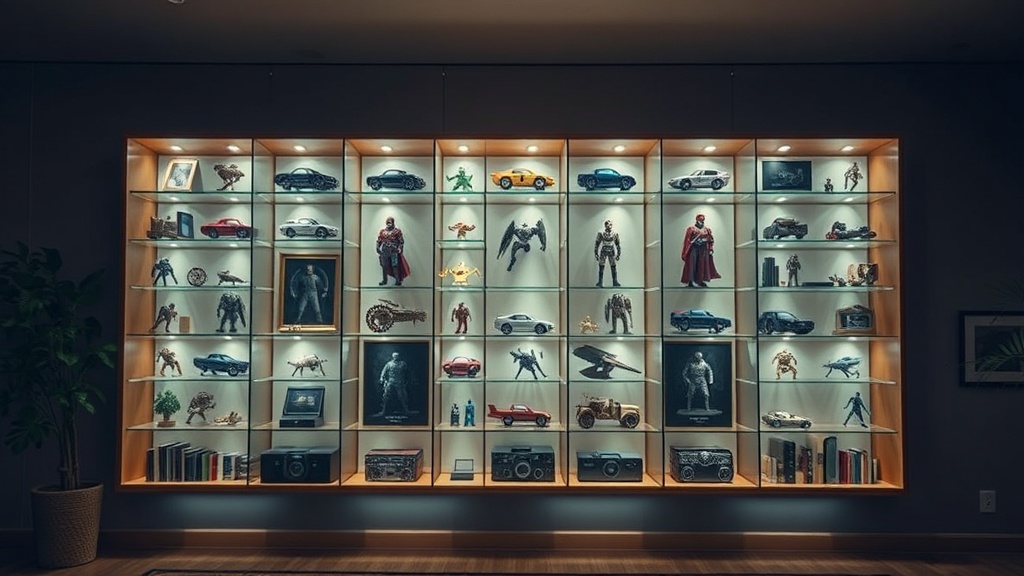
Why Wall Displays Beat Shelves for Growing Collections
Shelves fill up. It's that simple. One day you're arranging your Series 1 minifigures on a bookcase, and six months later you're stacking mystery boxes in front of older figures just to keep everything in one room. Wall-mounted modular displays solve this problem by expanding vertically and horizontally without consuming floor space.
The key word here is modular — individual units that connect or sit adjacent to one another. When you buy a new series, you add another unit. When you complete a theme, you rearrange the layout. Unlike fixed shelving, modular systems adapt to what you actually collect rather than forcing your collection to fit predetermined dimensions.
I've watched collectors in our Edmonton community start with a single 12-inch acrylic case and end up covering entire walls with interconnected displays. The trick isn't buying everything at once — it's choosing compatible components from the start.
What Materials Work Best for Minifigure Display Cases?
Acrylic dominates the display market for good reason. It's lighter than glass, won't shatter if knocked, and offers crystal-clear visibility. Look for cast acrylic rather than extruded — it has fewer internal stresses and resists yellowing over time. UV-resistant acrylic costs more upfront but protects printed torsos and rare colors from sun damage if your display wall gets natural light.
Wood frames provide warmth and customization options. IKEA's RIBBA and SANNAHED frames have become collector favorites because their depth accommodates minifigures standing on plates, and the removable front makes rearranging simple. For a more premium look, shadow boxes from craft stores offer deeper chambers — useful if you want to include small builds or custom bases behind your figures.
Metal grid systems (think wire shelving mounted vertically) work surprisingly well for active traders. You can hang individual cases, bags of parts, or even completed sets using S-hooks. The industrial aesthetic isn't for everyone, but the flexibility is unmatched.
Avoid standard picture frames with glass unless you're displaying sealed polybags. The depth is usually insufficient, and opening them repeatedly wears out the backing clips. I've seen too many collectors crack glass trying to squeeze a baseplate into a frame designed for flat photos.
How Should You Plan the Layout Before Mounting?
Start on the floor. Seriously — lay out your cases in the arrangement you're considering, stand back three meters, and look at them. Wall displays read differently than shelf displays because viewers take them in all at once rather than scanning horizontally.
Group by theme, not chronology. Your brain processes visual information better when related items cluster together. Put all your Castle figures together even if you acquired them over five years. Separate them by faction if you have enough — the color blocking creates visual rhythm that draws attention to individual figures.
Consider sight lines from doorways and seating positions. The center of your display wall should sit at eye level — approximately 57 inches from the floor for standing viewers, slightly lower if you display primarily from a desk or chair. Leave breathing room between cases; crowding diminishes the impact of individual minifigures.
Plan for expansion by leaving gaps or choosing cases that stack. If you know LEGO releases two Collectible Minifigures series annually, calculate your average acquisition rate and ensure your wall can absorb three years of growth without looking cramped.
What's the Best Way to Light a Minifigure Display Wall?
Poor lighting kills even the best-arranged collection. Minifigures are small — details get lost in shadows. You need even, diffused illumination that reaches every figure without creating harsh reflections on acrylic surfaces.
LED strip lights mounted above each case work well, but position them toward the front edge rather than flush against the wall. This angles light onto the figures' faces rather than their backs. Warm white (2700K-3000K) renders colors more accurately than cool white, which can make flesh tones look sickly and reds appear orange.
Battery-operated puck lights offer flexibility for renters who can't hardwire fixtures, though you'll develop a relationship with your battery supplier. Rechargeable units have improved significantly — look for ones with remote controls so you can adjust brightness without climbing on furniture.
Avoid direct sunlight at all costs. Even UV-resistant acrylic can't fully protect against prolonged exposure. If your only wall option faces a window, install blackout curtains or position your most valuable figures in interior cases away from the light path.
How Do You Maintain and Rearrange Without Damaging Figures?
Modular systems require periodic reorganization — new releases, completed sets, or simply changing tastes. Develop a removal routine: open the case, photograph the current arrangement for reference, remove figures with both hands (never pull by the head), and place them on a clean microfiber cloth while you work.
Dust management separates serious collectors from casual owners. Compressed air works for tight spaces between figures, but hold the can upright to avoid spraying propellant. A soft makeup brush (synthetic bristles, never natural hair that can shed) reaches corners that air cannot. Clean cases quarterly; dust that settles for months bonds with static electricity and becomes difficult to remove.
When adding new cases to an existing wall, remove adjacent figures first. Drilling, hammering anchors, or even applying adhesive strips creates vibration that can knock precariously balanced accessories loose. Better to spend ten minutes being cautious than to spend forty hunting for a tiny epaulette that fell behind the baseboard.
Scaling Your System for Different Collection Sizes
Small collections (under 100 figures) benefit from unified aesthetics. Choose one case style and arrange it in a grid. The repetition creates visual cohesion that makes modest collections look intentional rather than scattered.
Medium collections (100-500 figures) can introduce variation. Alternate between shallow cases for single figures and deeper shadow boxes for small vignettes. This creates visual rhythm — the eye travels between dense and sparse areas, keeping the display engaging during long viewing sessions.
Large collections (500+ figures) should consider zoning. Dedicate specific wall sections to themes, eras, or rarity levels. Some collectors maintain a "rotation gallery" — a central case that changes monthly while the surrounding permanent collection stays fixed. This keeps the display fresh without requiring massive rearrangements.
Document everything. Photograph your layout, note which figures occupy which cases, and update the records when you move things. Insurance companies appreciate thorough documentation, and you'll appreciate having reference photos when you're standing in a store trying to remember whether you already own that particular Pharaoh.
"The best display is one you'll actually update. If adding a new figure requires tools and twenty minutes, you'll procrastinate until your backlog becomes overwhelming."
Start simple. One case, properly lit and positioned, beats twelve cases haphazardly nailed to drywall. Build slowly, choose compatible components, and remember that your collection will outgrow any single configuration — the goal isn't a permanent solution, but a system that evolves as gracefully as your acquisitions do.